January 29, 2014

CHICKEN WRAPS

There were times especially during dinner time, when we prefer to have bread or pasta for dinner instead of the usual rice and viand. And it is during this time that we like to have something different but satisfying. So what I am going to do is to grab whatever is in the fridge and go ahead and buy whatever ingredients is needed to complete this dinner. I am referring to Chicken Wraps. This is easy, fun and yummy and you can ask your kids to prepare this delicious dish with you.


INGREDIENTS:
1/2 Kilo boneless chicken
Rosemary
salt and pepper to taste
Pita bread
Quick melt cheese
Tomatoes
Cucumber
Cabbage
White onions
Carrots
Sour cream or yogurt


Procedure:

  1. Sprinkle rosemary herb over chicken, add salt and pepper to taste and set aside.
  2. Arrange the coleslaw by combining all the vegetables sliced thinly and pour over sour cream or yogurt. 
  3. Season with salt and pepper then put in the fridge to chill a bit.
  4. While chicken is ready, you can pan fry it or roast over open fire (charcoal) 
  5. Top it with quick melt cheese and slice according to your preference.
  6. Wrap it in pita bread together with the freshly made coleslaw and there you go. Chicken wraps made in no time! enjoy!!


*Note: you can choose to make coleslaw or salsa according to your preference. Go ahead explore!

CHICKEN ADOBONG PINAKURAT

I have blogged about this famous vinegar from Iligan City for my Pinakurat na Pusit and I just cant help creating dishes mixed with Pinakurat vinegar. And now I made a version of Chicken Adobo and see if you want to try this recipe to make your own version. The vinegar is just so tasty and the sour taste is just fine to tickle your palette. This is simple, easy and quick to prepare.


Ingredients:

1 kilo of chicken (choice adobo cuts)
salt and pepper to taste
Bay leaf
Sukang Pinakurat
4 tabsp of minced garlic

Procedure:


  1. Just combine all ingredients in a pan, let it simmer until it is cooked and tender and VIOLA!! 
  2. Cooking can always be fun and easy!Serve and enjoy!!


January 28, 2014

BUFFALO WINGS CIK STYLE


It was once a trending in FB that women who eats chicken wings very often has the highest chance of acquiring breast cancer. It is because of the steroids or some kind of chemical being injected in the chicken (injected specifically in the chicken wings and neck part) to accelerate its growth. I am yet to research more on that but as a chicken wing lover myself, I would rather set that issue aside and continue to savor and enjoy the fullness of its flavor. Besides, if the medical findings are true, eating buffalo wings once in awhile would be fine ;). My version is quick and easy and can be cooked and enjoyed in no time.


INGREDIENTS:

1 kilo chicken wings
tomato catsup
brown sugar
Worcestershire sauce
Rosemary
Salt and pepper to taste
Soy sauce

Procedure:

  1. Wash and clean the chicken wings and drain.
  2. Make the marinade by combining the tomato catsup, soy sauce,brown sugar,Worcestershire sauce salt and pepper to taste and marinate the chicken for 1-2 hours or overnight.
  3. Once ready to cook, lay it over a baking pan and bake. In my case I used turbo broiler and cook it over slow heat for the first few minutes and turning the heat at medium to high 5 minutes before turning the broiler off.
  4. You can put baby potatoes rolled over the remaining marinade and bake with the chicken wings.
  5. Enjoy!


January 27, 2014

GARLIC CHICKEN AND BEEF-MUSHROOM CHOWDER

Planning ever day meal is always a challenge for all of us moms, especially the working and busy moms out there. So I always make it a point to come up with delicious, nutritious and mouth watering dishes which our kids will truly enjoy. Try this traditional dish with a twist and let your kids do the talking. 


INGREDIENTS:

Garlic Chicken:

1/2 kilo chicken (choice cuts)
3 tbsp flour
2 tbsp cornstarch
salt and pepper 
3 tbsp calamansi extract
5 cloves of garlic minced

Procedure:

  1. Marinate the chicken in salt, pepper, calamansi and garlic. (1-2 hours or overnight)
  2. Once ready to fry, combine flour and cornstarch then season with salt and pepper.
  3. Coat the chicken with breading and deep fry until cooked and golden brown.
  4. Serve as is or with gravy.
Gravy sauce preparation:
  1. With the remaining flour and cornstarch, add water enough to get a saucy consistency. Add some seasoning and cook it over low fire until thickens, serve with garlic chicken.
Beef and Mushroom Chowder:

Any kind of mushroom - Shitake or Button mushrooms (sliced thinly)
Ground beef 
Fish sauce
3 tbsp minced garlic
3 tbsp minced onion
3 tbsp flour and water mixture (to thicken the chowder)
Celery (sliced)

Procedure:
  1. Saute garlic and onion. 
  2. Add ground beef until cooked and tender. Pour in water and season with fish sauce.
  3. Let it simmer then add mushrooms and celery.
  4. Season with salt and pepper and add the flour and water mixture to thicken the chowder.
  5. Serve piping hot.


January 10, 2014

BRAISED BEEF BULGOGI WITH KOREAN RADISH AND BEETS KIMCHI

I think I already mastered the art of cooking Beef Bulgogi and thanks to my You Tube idol Maangchi for the Korean dish that she shares and unbelievably, every Korean dish that I cook is really superb. Now, I have my own version of Beef Bulgogi which is little different from the authentic Korean Bulgogi because for one, I braised it instead of the traditional roasting over open fire and second, I used the Bolar blade cut instead of the prime cuts as bolar blade is less expensive but with more flavors in it although contains several connective tissues. This connective tissues if not removed causes the beef meat to become firm and hard. So what I normally do with this is ask my butcher to remove those and cut it across the grain (rule of thumb for beef) and I will cook it by braising so I can achieve the tenderness of the meat I always wanted. 


INGREDIENTS:
500 grams Bolar Blade meat cut into bulgogi or cubes
1 medium size pear 
2 tbsp Soy sauce
2 tbsp Sesame oil
3 tbsp minced garlic
3 tbsp minces onion
some green onions
2 tbsp brown sugar
toasted sesame oil
pepper to taste

PROCEDURE:
  1. Put all the ingredients in a processor (except for the beef) and marinate over night (same procedure with the authentic Korean Beef Bulgogi recipe)
  2. After marinating, cook it over a crock pot or slow cooker in 30-45 minutes or until the meat is tender. 
  3. You can pinch it with a fork from time to time to check, you can add some few water if you can see that the liquid has evaporated to avoid burning.
  4. Once cooked and tender, prepare to plate and pair with steamed rice and radish and beets kimchi.
  5. Stay connected for the separate blog for the recipe radish and beets kimchi.
  6. Enjoy! 


Enjoy!


January 09, 2014

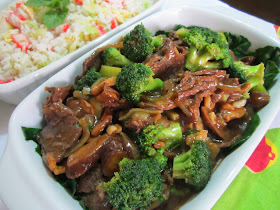
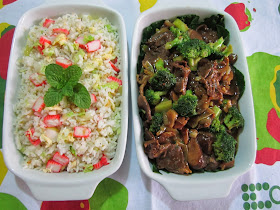
BEEF BROCCOLI IN OYSTER SAUCE

My 15 year old daughter is a big fan of Broccoli, she would always ask me to cook for her any dish that goes along well with Broccoli. And what pops up into my mind instantly is to cook it along with yakiniku sliced beef and pour over a special sauce or the oyster sauce. Check out the ingredients and see how easy, quick and yummy this dish is and why my daughter falls in love with it over and over again. :)


INGREDIENTS:

500 Grams Broccoli
500 Grams Beef Yakiniku 
3 tbsp Oyster Sauce
2 tbsp minced garlic
2 tbsp minced onion
water and starch mixture (2 tbsp cornstarch/1/2 cup water)
Soy sauce
pinch of sugar
Oil 
sesame oil
Salt and pepper to taste

Procedure:
  1. Saute garlic and onion in a pan.
  2. Add the beef and cook until tender by adding water and allow to boil for 4-6 minutes.
  3. When beef is tender, season with salt and pepper, oyster sauce,sesame oil and soy sauce.
  4. Add a pinch of sugar then pour in the cornstarch and water mixture and continue to stir until the sauce is thicken.
  5. Add the broccoli and turn off the heat immediately. It will allow the broccoli to cook more but will not be overcooked.
  6. Serve and savor the taste!!


*Watch out for the separate recipe for the Crab and Egg Fried Rice, stay connected!


January 08, 2014

CEREAL CRAB CLAW

Festive season is over and I was left with so much TO DO on my list. And one dish that I promised to feature is the Cereal Crab Claw requested by Ms Rodalyn Belayro. I apologize for the late posting. I hope you will try this recipe and let me know how it work with you. Check out the ingredients.


INGREDIENTS:

1 kilo CRAB CLAW ( I got the chance to buy some of these crab claws in Divisoria amidst hurly burly last Holiday Season)
200 grams French Beans (optional or you can use Baguio Beans)
2 tbsp minced garlic or more depending on your preference
1 medium size onions (minced)
5 pcs Kaffir Lime leaves
2 tbsp Butter
Olive Oil
1 pack of Nesvita Cereal Original
Salt and pepper
Chili flakes
Water (or stock) or Soda (7-up)


PROCEDURE:

  1. In a pan, pour in the oil and butter and put the Kaffir Lime Leaves until it infuses the aroma.
  2. Then saute with garlic and onions until it cooks.
  3. Place the crab claw and cook until it turns red, putting some liquid from time to time so it wont get dry.
  4. Once the crab claw is cooked, pour in the Nesvita Cereal Original Flavor, season with salt and pepper and add the chili flakes.
  5. Mix in together until the cereal covers everything. 
  6. Add the French Beans and serve.


Enjoy!!!